Review
It's one for the tubes
Too lazy to labour over circuit diagrams, SUJESH PAVITHRAN gets a DIY amp all done up and delivered home to him ... so, when's the pizza coming then?NO, I haven't been bitten by the DIY bug, nor is this a likely possibility in the foreseeable future. I prefer my hi-fi equipment delivered to me built up, all ready to go. The soldering gun I have is used mostly for repairing guitar cables or occasionally adjusting the innards of a phono stage.
Yet, here I am, chewing the fat with you over what is essentially a piece of kit gear from the stores of a local hi-fi DIY pioneer -- Octave Electronics. Why? Because I was curious to find out how much the DIY industry here -- however miniscule -- has progressed over the years. Besides, I've been hearing things about some of the amps emerging from the Octave stables.
 So
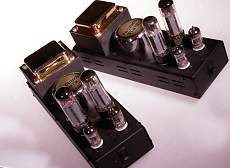
here it is, from the Vacuum State Electronics range designed by cable guru
Allan Wright, using a locally manufactured chassis and transformer, and
with other imported parts -- the PP-1 monoblock power amplifier. It is
available as a full kit for diehard DIY-ers, or Octave will sell you a
completely built up version for a few hundred bucks more.
So
here it is, from the Vacuum State Electronics range designed by cable guru
Allan Wright, using a locally manufactured chassis and transformer, and
with other imported parts -- the PP-1 monoblock power amplifier. It is
available as a full kit for diehard DIY-ers, or Octave will sell you a
completely built up version for a few hundred bucks more.
You can upgrade the PP-1 in various stages or opt for alternative operating modes, but what I have here with me is the basic unit, about which I'll go into detail shortly.
Given the rising cost of imported amps, local kits like the PP-1 take a good chunk out of distributor mark-ups and pass the savings on to the consumer. So, perhaps this may be the time for the likes of Octave to make its mark ....
Features
Each PP-1 comes mounted on a laser cut stainless steel chassis and is powered by a toroidal output transformer. The amp is oblong in shape, with much longer sides than front and back. On top, in front of the transformer, you'll find two Svetlana ECC88 and two Sovtek EL34 valves, wired to perform in pentode mode and delivering 25 watts.
However, should you be handy with circuitry, the manual will guide you through the steps required to convert this to triode mode; the gains will be a more liquid sound, says the manual, but one assumes that, with the power halving to 12 watts, there will be a different approach to bass performance.
I was curious to try the trio mode, but Anthony Lim, it appears, salted way the only copy of the instruction manual available as I write this, and refused to pass it to me. So, the PP-1 is being reviewed here in its basic pentode guise.
Point-to-point wiring and fully symmetrical circuit topology are some of the other features of the PP-1; the amp's frequency response range is quoted at between 10Hz and 40kHz.
The layout is simple -- just an on/off switch on the fascia, signal input terminal, mains lead input and a pair of speaker outputs on the rear. There's a comfortable, cottage-industry feel about the PP-1 that DIY fans will love; yet, I found it aesthetically unobtrusive and pretty well put together, except for the three contact cones the base-plate. It's not as sturdy as the more conventional four-point contact.
Upgradeables? You can take out the EL34s and substitute them with 6L6GCs, KT66s or KT77s to run in pentode, triode or tetrode modes. Change the power transformer, use 6550s or KT88's and you can get up to 50 watts of power. Change the tube sockets and you can accommodate 2A3 or 300B tubes on the PP-1. Octave promises to keep each PP-1 owner updated on any new upgrades that can be made to the amp.
Performance
The PP-1, according to the manual, is capable of delivering into the difficult loads offered by electrostatic and dynamic speakers, but naturally works best driving horns. Not having one within convenient reach, I settled for my personal reference, the Monitor Audio Studio 15, using van den Hul The Wind cables. Also doing duties were a pair of QLN Qubic 111, which pretty much defines the art at its RM1,000-plus price range.
Sources included Audiolab 8000CDM/8000DAX for digital source, Michell Gyro Dec/Morch DP-6/vdH MM1 for analogue, with various connects from vdH and Ixos sharing chores.
Octave provided me with a custom-designed passive preamp to use with the PP-1 monoblocks; I also used an Audiolab 8000Q and was about to run the amps with an Audio Note line preamp, but it turned out the latter was faulty. Preamp-monoblocks connects alternated between Audio Note and Ixos Silver Bullet.
First up -- the PP-1s were linked to the 8000Q and Studio 15s, with some unlikely results; the latter isn't that easy to drive, but the monoblocks showed little sign of faltering. Octave's Michael Loke also appeared surprised when I told him the PP-1s worked pretty nicely with the 8000Q.
Bass, that invariable chink in the armour of cheaper valve amps, is surprisingly sturdy, full-bodied and relatively uncluttered, possessing better rhythm than I've heard in a number of other valved jobs around the price.
The passive preamp does the job well enough, but it is when the 8000Q is added that the sense of timing and cohesion becomes better defined. Out with the Audio Note connects, in with the Ixos, and some of the fatness was taken out of the low frequencies, replaced by a dry, if taut, quality.
Not surprisingly, the valve traits are manifested in the breathy midrange -- particularly kind to vocals by adding dimension -- and the lush treble. These qualities can be tempered by choice of ancillaries, the monoblocks proving to be sensitive to changes in connects and preamps.
Yet, what remains through the changes are a subtly relaxed sound stage and the ability to replicate -- even if not in the purest of tones -- then at least the soul of the recordings.
These monoblocks showed no sign of cracking under the strain of high volumes levels -- in fact, the harder I pushed them, the more vividly they communicated, without making a mess of the proceedings.
Conclusion
This is a very encouraging design, and one that holds promise of a higher level of achievement along the upgrade path. Seldom faltering, infallibly musical and, despite their nature, possessing a good amount of pizzazz in the bass department, the PP-1s are surely for valve enthusiasts who can't afford big bucks for more esoteric brands.
Yet, it isn't the price alone -- RM3,400 for a built-up pair -- that makes the PP-1 so attractive; it is what these monoblocks do for the price, and what they can do further up, that make them so tempting.
And in such times, the PP-1 must surely be an option for the keenest of audiophiles amongst you.
And here's a little DIY-type note from D.S. YEOW, who happily built the kit ...
FOR DIY-ers, this kit gives you an excellent opportunity to build an amp using the point-to-point technique -- a method of connecting the components together without wires or PCBs.
The kit comes complete, and I mean it. The whole works. Two stainless steel chassis, output and power transformers, valves and valve bases, metal film resistors, quality capacitors, mounting brackets, bolts, nuts, washers, IEC sockets, RCA input sockets, speaker terminals, wires and the instruction manual.
Don't take my word for it -- find out for yourself. By the way, the manual is comprehensive, with step-by-step instructions to guide you all the way to the end. Of course, circuit diagrams are provided for the old-hands, if you like to do it your way.
I found mounting all the main components like transformers, valve bases, connectors, easy and hassle-free. Doing that first allowed me to concentrate on the inner works, starting with the power supply section to the input and output stages. For the more experienced, this is where they can go wild with their creativity. You can lay out the power supply section the way you like it; personal preferences or different schools of thought would bring about variants as to how the diodes should be placed, the smoothing caps etc. Arrange all you like, but make sure not to break the fundamentals of grounding and isolation. Follow the circuit diagram and you'll be fine.
The next thing I did was to wire in the heater wires to all the valve bases. This was done using the thick wires provided. Here, I can almost hear some of you say that it should be wired in parallel, in series or both. Sure, the current demands would differ depending on which you chose, but the power supply can handle them all. Write in if you find one particular arrangement better than the other.
The thick ground wire goes in next from the IEC socket to a central grounding point. This is an important point to note as there are no other grounding points for the entire signal path except this one. Follow this strictly and it'll save you lots of trouble later. Believe me, don't even think; just do it.
Next, I proceeded to work on the output section. Again, a lot of flexibility exists for anyone keen to experiment, which by the way, you can choose between a Pentode or a Triode mode output stage. Besides the output power difference of about half in triode mode, the sound can be rather surprising. I recommend that you try it, and if it suits you, stick to it. Should you get tired of it, switch it back. That's the beauty of DIY.
Moving on, I worked on the input stage. This is where I took a little extra care to avoid introducing hum. As a rule, I strongly believe in "the shorter the path the better" and this is where you'd want to make no mistake about it. Look out for shorts and trim all excess leads always. It is a lot easier to trim immediately after you have soldered a component in as there will not be much space to do so when more are in place. By now, it's almost done, with just the input, feedback and output wires to solder in. Use wire-wrap-wires. WWW? Yes. These puny and fragile things, you may think, are strongly recommended by Allen Wright and I can vouch for it (for more info on this, read his Supercables Cookbook).
Before I continued any further, I patiently spent time in checking all the connections, components, wires etc. It certainly was well worth the effort as it gave me the opportunity to correct whatever mistakes that I may have made. Once I was certain, I powered up the amp without the valves to ensure that the power supply section was working properly.
Do exercise extra caution here. As in any valve amplifiers, the HT voltages are dangerous, if not lethal. Make sure you take all the necessary precautions. Satisfied that it was working well, the valves went in and the amp was ready for testing. I tried them with an old pair of speakers, just in case (better to be safe than sorry). Once everything checked out, the PP-1 went in with my regular speakers and it has remained a happy marriage ever since. Well, at least until some new components that I intend to use for an upgrade arrive, that is.
Model: Vacuum State Electronics PP-1 monoblock power amplifier
Price: RM3,400 per pair (assembled) / RM3,000 (kit)
Review sample courtesy of OCTAVE ELECTRONICS (03-793-7939), 81 Jalan
1/12, 46000 Petaling Jaya, e-mail: octave@pc.jaring.my
For: Uncluttered, well-defined and rhythmic bass; legendary valve
attributes, like the rosy mids and highs; in pentode mode, drives impressively.
Against: Ancillary sensitive, so some mix "n" match efforts
are required to optimise performance.
AudioFile © 1998, Star Publications (Malaysia) Berhad (No. 10894-D).